
Introduction
Over the past couple of months we have been working with VMware to migrate from a pair of Citrix Netscaler Application Delivery Controllers (ADC) appliances to a VMware NSX Advanced Load Balancer (NSX ALB) solution. It has been a smooth transition with the product achieving what was said on the packaging and the professional service team providing great service and technical insight on both the proof of capability and migration.
Planning and Procurement
Last year we had identified in our planning that the Netscalers are due for their End of Life in January 2024. For the requirements, outside of typical ADC features and capabilities, I wanted a cloud ready solution, WAF capabilities, and certificate automation. Given this, we kicked off a market discovery effort to see what’s available. We reached out to F5, Citrix, Fortinet, and VMware, arriving at the following conclusions:- I have used F5 BigIP LTM in the distant past and found them to be solid and that appears to still be the case - however they are a substantial investment.
- Citrix, being the incumbent, provides familiarity and a simplified migration. However I found their support challenging, substantial increases in prices a concern, and their management and analytics platform wasn’t performing for us.
- We're very happy with Fortinet for our network security services. However, their strength lies in firewalls, SD-WAN, and many other areas but their FortiADC was a little behind its competitors in the functionality that I was looking for. Fortinet was very helpful in providing a VM license for me to try it out and in answering any questions I had.
- VMware was considered because we, with RiOT Solutions, had deployed NSX-T environment as part of a Data Centre refresh project and at that time they had just acquired Avi Networks and were rolling the Avi Advantage load balancer into the NSX portfolio. The pending Broadcom merger was worrying but given that we’re heavily invested with VMware any transition would be slow and beyond the lifespan of this deployment.
Given that we have yet to establish a cloud strategy I figured that a solution that can accommodate all combinations of on-premise, co-location, private, and public clouds would save effort and position us well for whatever hosting solution we settled upon. F5 and Citrix have capabilities that accommodate public clouds but NSX ALB could be considered a cloud native solution and excels in these environments while providing excellent support for traditional on-premise infrastructure.
We produced a position paper with the above options, including costs, with the recommendation to go with NSX ALB. It was an easy recommendation to make as it was substantially cheaper than F5 and Citrix for the same, if not better, capabilities and support.
Prior to purchasing NSX ALB we engaged VMware to run a facilitated proof of capability environment within our environment. At the time of writing this is a free service providing a number of professional service hours and various documents outlining what will be tested and the outcomes of the tests. I found the PoC valuable in that it allowed me to become intimate with the solution and how it applies to our needs. The PoC also allowed me to demonstrate the proposed solution to the team and other IT stakeholders which carries more weight when it is operating within our environment with our test applications. The information obtained from the PoC helped with the high level and detailed design stage of the actual implementation.
If you do not wish to run a formal PoC but would like to spin up a test environment then the controller image comes with a 30 day evaluation licence and a trial licence that goes until January 1st 2035 in my case. The difference being the number of vCPUs available to use for the Service Engines (SEs), 20 for the evaluation, 2 for the trial, I’ll explain licences later.
Note: I also looked at CloudFlare as we use it for public DNS. I have utilised its more advanced features for other organisations and they can provide similar capabilities to the above products - however the adoption would entail quite a mind shift in this case but I will certainly look at CloudFlare in future.
Design
The Netscalers consist of a pair of physical appliances, MPX8015’s, in an active/standby HA configuration. A MPX8015 is capable of up to 6Gbit/s TLS/SSL throughput. We use ‘AppExpert’ which are basically HTTP responder/rewrite rules and ‘Traffic Management’, which makes up the Virtual Services and Pools. There are no security, automation, and scalability considerations to be had with the Netscalers.

System requirements for the NSX ALB controllers vary depending on where you wish to deploy them, the number of SEs, number of Virtual Services, desired amount of logging and analytics. In this case, deploying to vsphere, I opted for 16 vCPU, 32GB RAM, and 256GB Disk - per controller node. For the SEs we went with 2 vCPU, 4GB RAM, and 25GB Disk each, 2 active/active pairs (4 SEs total). This will provide us with 16Gbit/s TLS/SSL throughput overall, 8Gbit/s per SE pair.
Active/active was chosen to best meet our application availability and performance needs. Active/active provides the least outage time in case of SE failure and the highest performance as both SEs are serving traffic. The other options are active/standby, which provides the best recovery time, but least performance, and N+M. N = minimum number of SEs, and M = number of ‘buffer’ SEs to handle the load should something occur to the N SEs.
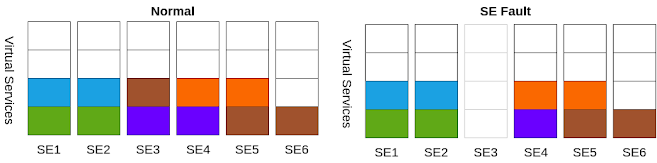
5 virtual services placed on an active/active SE group consisting of 6 SEs. During a fault, all virtual services continue to operate, although some experience degraded performance.
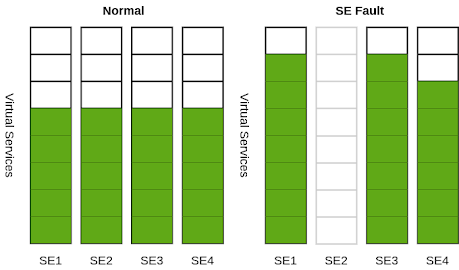
Elastic HA N+M group with 20 virtual services, before and after a failure. Virtual Services per Service Engine = 8, N = 3, M = 1, compact placement = ON.
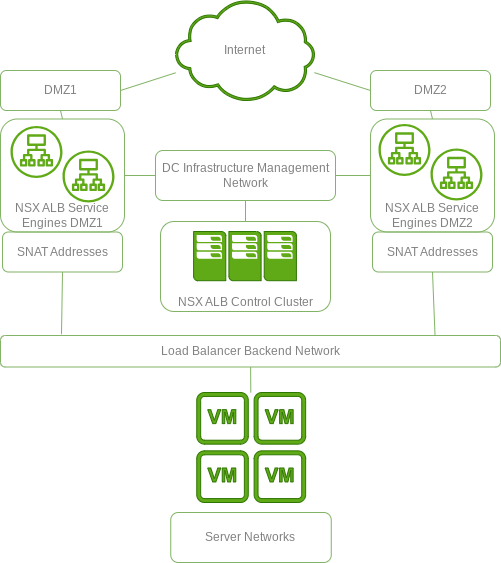
VMware recommended that a pair of SEs be used for each of our DMZ networks. This works out well because our services are evenly distributed across both DMZ networks and therefore the load is evenly shared. Additionally there is less ‘shared fate’ between the two DMZ networks, making them a little more distinct from each other.
NSX ALB implementation
Setup
Deploying NSX ALB into an on-premise vSphere environment is straightforward. Deploy three controller OVAs, set up the first one and then bring in the other two to automatically establish a cluster. Then go through and configure all the usual items such as DNS, NTP, Authentication, notifications, logging etc.
Next is the licensing and connecting the controller to the Avi Pulse Portal if you are after the advanced licence features such as proactive support, threat feeds, and central management of controllers (useful if say you have an on-premise controller, and a cloud based controller or SaaS and want a single management interface). The licensing is on a per vCPU basis. In our case we deployed 4 SEs with 2 vCPUs each, meaning we needed 8 licences. There are four tiers of licences - essential (for VMware Tanzu), basic, enterprise, and enterprise with cloud services. For most it will be a decision between the enterprise and enterprise with cloud services - the latter requiring a connection to Avi Pulse. Licences are ‘checked out’ by the controller from the portal, and then assigned to the SEs. This occurs on a regular basis and provides a reasonable grace period should it not be able to access the portal. If a SE becomes ‘unlicensed’ then it will keep working in the same way, but it will not come back should they be restarted or deleted.
After the controllers are established you then connect it to vSphere via its API, this is shown as a ‘cloud’ - the controllers can manage many environments, each shown as a separate cloud. Using this connection, the controllers will automatically deploy and provision the Service Engines (SEs) as defined by the Service Engine group configuration. The SEs are the workers, they handle the actual application delivery/load balancing.
You may download a web server image, perf-server-client.ova, to test NSX ALB. You can find it in the same location as the controller images (https://portal.avipulse.vmware.com/software/additional-tools). This image comes with various utilities for testing a load balancer such as Iperf, ApacheBench, and files of various sizes to download. I used a few of these to test out the controller and SEs prior to the migration. Note that Service Engines won’t be deployed unless a virtual service needs them so it’s a good idea to use a test virtual service to kick off the deployment.
perf-server-client.ova default web page
Migration
Once the controllers and SEs are set up and tested, the migration from the Netscalers can begin. In this case VMware provides a docker image that has the necessary scripts/tools to handle a migration from other load balancers to the NSX ALB. You can find it here: https://github.com/vmware/nsx-advanced-load-balancer-tools . In our case a live migration was recommended (connecting directly to the Netscalers API) as this will migrate the certificates, otherwise you can download the Netscaler configuration file and use that as the source.
The migration was a three step process - connect and download the configuration from the Netscalers, translate the configuration to NSX ALB, then upload the configuration to the NSX ALB controllers. It was relatively easy but does require attention and a systematic approach. Best to track each virtual service/application in a spreadsheet.
Run up the Avitools docker image with an interactive shell:
cd ~
mkdir migrationtool
docker pull avinetworks/avitools:latest
docker run -td –hostname avitools-22.1.4 –name avitools -w /opt/avi -v ~/migrationtool:/opt/avi –net=host avinetworks/avitools:latest bash
Netscaler configuration conversion command which downloads and converts the configuration (ensure the Netscaler user account has appropriate permissions):
user@avitools-22:/opt/avi# netscaler_converter.py -ns_host_ip 172.10.10.22 –ns_ssh_user <username> –ns_ssh_password <password> –not_in_use –tenant admin –controller_version 22.1.5 –cloud_name vcenter01 –segroup sec-aa-dmz1 –ansible -o config_output –vs_level_status –vs_filter FirstVSName_lb, SecondVSName_lb, ThirdVSName_lb
The output will be something like:
133537.211: Log File Location: config_output_20231108
133537.221: Copying Files from Host...
133546.399: Parsing Input Configuration...
133609.875: Progress |##################################################| 100.0% \
133610.139: Converting Monitors...
133610.259: Progress |##################################################| 100.0%
133610.259: Converting Profiles..
134952.117: Progress |##################################################| 100.0%
134952.178: Converting Pools...
134953.193: Progress |##################################################| 100.0%
134953.193: Converting VirtualServices...
134953.335: Progress |#######-------------------------------------------| 15.3% /usr/local/lib/python3.8/dist-packages/avi/migrationtools/netsca134953.335: ler_converter/policy_converter.py:574: FutureWarning: Possible nested set at position 8
134953.335: matches = re.findall('[0-9]+.[[0-9]+.[0-9]+.[0-9]+', query)
135011.515: Progress |#################################################-| 99.8% \Generating Report For Converted Configuration...
135025.660: Progress |##################################################| 100.0%
135032.026: SKIPPED: 435
135032.026: SUCCESSFUL: 2761
135032.027: INDIRECT: 1355
135032.028: NOT APPLICABLE: 161
135032.029: PARTIAL: 214
135032.030: DATASCRIPT: 45
135032.030: EXTERNAL MONITOR: 109
135032.031: NOT SUPPORTED: 54
135032.032: INCOMPLETE CONFIGURATION: 588
135032.033: MISSING FILE: 0
135032.033: Writing Excel Sheet For Converted Configuration...
135618.648: Progress |##################################################| 100.0% \
135634.108: Total Objects of ApplicationProfile : 4 (5/9 profile merged)
135634.108: Total Objects of NetworkProfile : 6 (2/8 profile merged)
135634.110: Total Objects of SSLProfile : 10 (186/196 profile merged)
135634.110: Total Objects of PKIProfile : 0
135634.110: Total Objects of ApplicationPersistenceProfile : 8 (90/98 profile merged)
135634.110: Total Objects of HealthMonitor : 56 (36/92 monitor merged)
135634.110: Total Objects of SSLKeyAndCertificate : 176
135634.110: Total Objects of PoolGroup : 446
135634.110: Total Objects of Pool : 575
135634.110: Total Objects of VirtualService : 421 (369 full conversions)
135634.110: Total Objects of HTTPPolicySet : 198
135634.110: Total Objects of StringGroup : 0
135634.110: Total Objects of VsVip : 231
135634.110: VServiceName-SSL_lb(VirtualService)
135634.110: |- 192.80.10.23-vsvip(VsVip)
135634.110: |- enforce_STS_polXForwardFor_Add_pol-VServiceName-SSL_lb-clone(HTTPPolicySet)
135634.110: |- VServiceName-SSL_lb-poolgroup(PoolGroup)
135634.111: | |- VServiceName-SSL_lb(Pool)
135634.111: | | |- ping_mon(HealthMonitor)
135634.111: |- ns-migrate-http(ApplicationProfile)
135634.111: |- testcertificate(SSLKeyAndCertificate)
135634.111: |- Merged-ssl_profile-KOc-3(SSLProfile)
…
The output will list all the Virtual Servers converted, as specified by the -vs_filter parameter.
This will create yml files in /opt/avi within the container (~/migrationtool on the host), the ‘avi_config_create_object.yml’ is the conversion output ready to be applied to NSX ALB.
Ansible playbook to apply configuration to NSX ALB (ensure the NSX ALB user account has appropriate permissions):
ansible-playbook avi_config_create_object.yml -e "controller=172.10.10.61 username=<username> password=<password>" --skip SomeUnwanted-VS_lb
Once all the configuration was migrated onto the NSX ALB controllers it was necessary to go through and clean up the configuration - removing redundant items (such as HTTP-HTTPS redirect rules that are handled by the Application profile), renaming items to suit our conventions and so forth. Then it was a case of disabling the virtual IP (VIP) on the Netscaler and enabling the virtual service (VS) on the NSX ALB. This was done in batches, starting with the development/test environments and then production, each batch was spread across a number of maintenance windows.
At the end there were only a handful of items that needed revisiting. These were primarily related to going to a ‘active/active’ Service Engine configuration which meant we couldn’t rely upon a single Source NAT address when talking to the backend hosts (one per SE minimum). Also, I took the opportunity to optimise the TLS/SSL profile to only allow TLS1.2/1.3 and enable various cross-site scripting and cookie protections - some applications didn’t take too well to some of these features so I fixed those on a case by case basis. Also keep an eye on any HTTP request/response policies and make sure they’re migrated correctly.
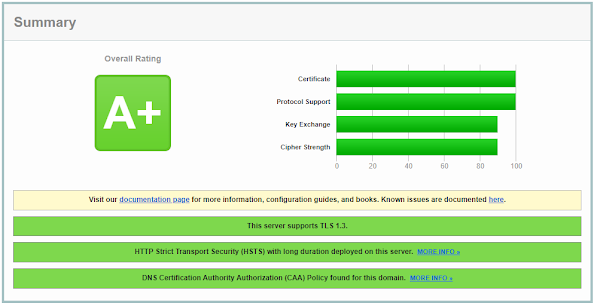
Qualys SSL Labs Report with the new TLS/SSL and Application Profile changes
Certificate Automation
With the migration completed and everything testing okay I turned my focus onto the TLS/SSL certificate automation capabilities of the NSX ALB. Out of the box it provides a Let’s Encrypt automation that works as is. However in our case we utilise a different CA that while providing an ACME compatible API it requires External Authentication Bindings (EAB).
I adapted the existing Let’s Encrypt automation script to support EAB and I have been testing successfully. Many CAs require the use of EAB when using ACME so this should prove a useful automation for others, for example I have tested it with ZeroSSL without issue. Certificate automation is going to save us approximately 600 hours a year and reduce the potential downtime and reputational damage caused by expired/incorrect certificates.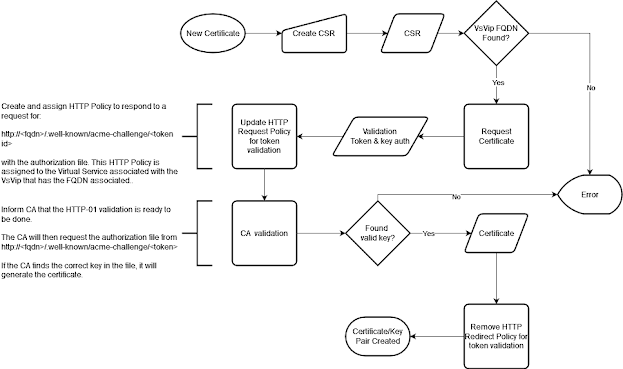
ACME Certificate Request Workflow
It’s possible to automate certificates using tools such as Ansible however having this done ‘on box’ means less effort and less moving parts. For example, automatic certificate renewal is started by a local system event, no need to poll, use external events, or monitor certificate validity periods.
Security Capabilities
ADCs are well placed to apply security functionality in that they can see the unencrypted data between the clients and servers without resorting to ‘man-in-the-middle’ techniques to snoop the traffic like a firewall does. Key security features offered by NSX ALB, with the top tier licence, are IP Reputation and Geographic Location databases that are sourced from WebRoot, Web Application Firewall (WAF) Application Rules service that are sourced from TrustWave along with signature lists, and WAF auto-learn capability.
Additionally, NSX ALB enables Denial of Service (DoS) protection by default at various layers of the network stack.
My view on any kind of WAF functionality is that it must be simple to manage and update - not manually picking through lists of signatures and having to have a deep understanding of the application. Therefore the application rules and auto-learn capabilities are what I will be looking to implement shortly.
Conclusion
As we migrate to the cloud we will be able to easily shift applications over as the NSX ALB can integrate with our DNS and IPAM services to automate DNS records and IP re-addressing. The ability to scale out and in automatically will offer us cost savings in public clouds too. When we migrate to the cloud it is likely we will utilise the SaaS controller and leverage the automation capabilities to ensure applications can be deployed in a seamless and timely manner. After that I will likely compare CloudFlare and NSX ALBs Global Service Load Balancing capabilities, with the aim to improve services to our international students.
To summarise, we now have a modern, cloud ready, scalable, application delivery platform that has done away with physical appliances and has uplifted our automation and security capabilities. I can recommend VMware’s NSX Advanced Load Balancer and their professional services team.
Special thanks to the project team that made all this possible.
Feel free to reach out if you have any questions about NSX ALB.

